Thursday, August 26, 2010

Flattery

I'm ridiculously flattered to have a shoutout from Brookelynn on Craftzine about my scarves!


I love blogging. :)

Crafty Mixtape

I made a mixtape for Poppytalk's mix tape challenge, and thought I'd share it with you, too!


I do think this mixtape would make an awesome soundtrack to craft to!

P.S. Since I heard School of Seven Bells on Daily Candy yesterday, I've been totally obsessed. Windstorm has been on repeat since then!!! Daily Candy was right!!! By the way, go to the link and listen to the acoustic version they do on the video. It rocks, too!

Wednesday, August 25, 2010

Ruffled Scarf

I saw this tutorial on Craftzine yesterday, and thought that this would a chic, easy, and CHEAP way to bring some colour to my back-to-school wardrobe.

So I went to the fabric store and got a half-metre of  a couple of different fabrics, as well as some elastic thread. (Oh gosh, can I just say how much I love elastic thread?!! I can imagine so many different applications!)

The first fabric jumped out at me because of this whole dip dye craze that seems to be going around right now. Thanks, Martha!

From here.

Okay, so this fabric's gradient only went from light to dark (like, for example, the red and white piece above), so I decided to cut the piece in half, and sew it together so the darker piece came at both ends of the scarf. I sewed a french seam so the place where the two pieces of fabric were sewed together wasn't so noticeable.

I was a bit worried about this fabric because it wasn't stretchy like the jersey fabric used in the Craftzine tutorial, but it worked fine. I did have to hem the edges of the scarf, which don't look too awesome, but because of the ruffliness (according to Firefox, that is not a word, but I say it is!) of the scarf, it's not noticeable. Turns out, it doesn't matter if the fabric is stretchy or not.

Okay, I took a picture of myself wearing it:

Wished I had pink thread. Oh well.
I love the peachy-pinky-coraly-fuchsiay colours of this fabric!

This was so fun to make! Freeform swirly S shapes all over the scarf and you get something cute!

So I decided to make another! I think I will give this one to my sister (which is a symbolic gesture, really, since because we live together and are the same size and both have great taste, we share all our clothes anyway). It came in a big loop, so I decided to make a necklace kind of version. If your fabric doesn't come it a loop, it would be easy enough to sew it together a-la french seam tutorial above.


And as you can probably tell by the shade of blue of that sky behind me, it's a beautiful day, so I think I will hop on my bike and take advantage of one of my very last days of summer! I'm back to school on Monday!

Tuesday, August 24, 2010

Kate Spade Book of the Month Clutch

I would die for this clutch. Die for it!!!!


All images from Kate Spade's site.

Hmmm, betcha I could DIY that...

Monday, August 23, 2010

Garden Apocalypse

It was only two posts ago that I wrote about my beautiful garden.

I am sad to say my dream of a crapload of tomatoes is gone, gone, gone.

We had this massive hail storm yesterday that completely destroyed my garden.

Before:

After:

Before:

After:

After:

I am so sad!!! All my hard work and tending and coaxing over the course of the summer for NOTHING.

Here's some pictures from yesterday during the storm:


So, so sad. :(

Sunday, August 22, 2010

Make your Own Chalkboard Paint!

It was a revelation when I saw Bonnie's DIY Chalkboard Paint Planters on Design*Sponge. I've since become a reader of Bonnie's blog, Going Home to Roost (which is great, by the way). Anyway, in her post about the planters, she informed that you can make your own chalkboard paint in any colour you want! Isn't that amazing?!?!

All you do is mix regular flat latex paint with a couple of tablespoons of unsanded tile grout.

Well, yesterday I had the opportunity to try for myself. I'm in the process of organizing my craft room, which sort of became an unorganized dumping ground for everything that didn't have a home. I needed some storage containers, though, so I bought a case of canning jars. I wanted to label them so that nothing would get put in them that didn't belong there, so I tested the DIY chalkboard paint.

I was pondering whether the paint would adhere to a nonporous surface like glass, but I decided to give it a go anyway. I think it would peel off and chip if you treated them carelessly, but as long as I'm gentle, it'll be fine.


I just used painter's tape to tape irregular shapes on the fronts of the jars, and gave them a couple coats of the paint. One word of warning: be sure to do this is a VERY well-ventilated area. I should have done it outside, actually. When you combine the unsanded tile grout with any other substance (as it says right on the label), "dangerous fumes result." And it's very stinky. So be careful.

But anyway, I am having ALL kinds of ideas for what else I can chalkboard-ify! Like I said, a revelation!!!

Thursday, August 19, 2010

How does your garden grow?

Much love to Elizabeth from To Be Charmed for featuring the skirt I recently made! Love that girl!

Now, I would like to show you some pictures of my "garden." I have to say, I got a bit ripped off in the "backyard" department at my condo. Everyone else has a bit of greenspace, and I have a visitor parking stall. Lucky me.

But anyway. I can't plant things actually in the ground, so I've made do with containers, and actually, my garden has really flourished this year. It's my first time planting vegetables on my own (aka not at Mom & Dad's) and my tomato plants are looking VERY healthy.

I repurposed an old laundry tub found in my parents' basement (a treasure trove for cool things, let me tell you!) and the tomatoes are so happy in there!

Trotsky is not happy that I just watered the plants and the ground is wet.

I love the cheerful coloured tomato cages!


They kinda look like they're turning red in this photo, but they're not. It's just the light.
The herb pot is happy. I planted carrots, too, and last I checked they were a couple inches long. I should check again. Sweet peas with the rigged up climbing thing. Haha. I'm awesome.
I love these! They are anemones, and are one of my favourite flowers. I found some rhizomes at the greenhouse when I was buying my plants, and decided to give them a try, not really expecting much. But they grew! And one is going to flower soon!! YAYAY!!!!
Now, is there anyone out there who knows anything about growing tomatoes?? Do I need to prune those suckers to get them to turn red?

Tuesday, August 17, 2010

Welcome to the Neighbourhood!

A couple of posts ago, I talked about how I want to put more effort into being generous and giving to others. Well, here's my first go at it!

My sister and I (who are roomates) have new next door neighbours. We're excited about this! Since we share a wall, it's important we get off on the right foot. I met the kids and mum yesterday. The kids are adorable, both girls, about 8 and 10, I'd say. I was outside yesterday with Trotsky and Oddly, who were both on their harnesses, and the girls came over to meet the cats.

By the way, Odd and Trot are best friends forever. Photographic evidence:
Trotsky with his arm around Oddly.
But anyway. I decided to make some raspberry-almond-dark chocolate muffins to welcome the family to the neighbourhood.

I've really been into sewing directly onto paper lately.
My sewing machine has lots of cool stiches like the squiggle stitch I used along the top and bottom.
I got the idea for the card's message from here.

After writing in the card, I hung it on their doorknob!
I hope they like it!

Friday, August 13, 2010

Mmmmm pizza

I've always wanted a wood oven. Basically, just to make pizza. We have this great pizzeria in Calgary called Pulcinella's Pizza, which makes Napoleon-style pizza. And they have this amazing open kitchen where you can watch them cook in the wood oven. The basic reason why a wood oven is good for pizza is because it can get really, really hot. Like 700 or 800 degrees hot.

Well guess what? So can your home oven! But only when you run the self-cleaning cycle. Kitchen Sidecar tells us how we can hack our own ovens to cook in the self-cleaning mode. And would you look at her pizza!!!
From KitchenSidecar.

Skirt skirt skirt!

It was a rainy day yesterday, so I made a skirt.

I am not confident enough in my sewing skills yet to actually use a pattern. I tend to get all confused by that type of precision work, though I think I'll challenge myself with one soon. Anyway, instead I used Freshly Picked's elastic waist skirt tutorial. I've made several skirts using this tutorial, and they're SO easy and SO cute. This time, I decided to add a little sash that can be tied in a bow!

So I followed Susan's pattern, except for one part.

I freehand cut these out of the leftover fabric. Four pieces total.

Then I pinned & sewed the ties with the wrong sides of the fabric facing outwards. I left the small end unsewed, and then flipped them right side out. I measured my waist, and cut a piece of elastic, then cut the elastic in two.

Next step was to sandwich the tie between the two pieces of elastic and pin.
And you have this silly looking thing.
Then all you do is sew the skirt as you would in the instructions. Take care to make sure the right side of the elastic is matched with the right side of the skirt fabric.
And you have a cute little bow! I need to practice tying it. It's a bit cockeyed there.
I like the Ikat-esque fabric I got in the bargain section at my local fabric store! I am all for prolonging summer as long as possible!

Tonight, my sister and I are having a friend over for dinner, and I am going to make a cozy roast beef. It's rainy again today and somehow called for that kind of meal. I'll make hericots verts and oven-roasted three potatoes (yellow, sweet, and yams) to go with it. Mmm.

Thursday, August 12, 2010

Generosity

Somehow (maybe Google Alerts?), Anthony Burrill found my post and offered to donate the posters I blogged about in my previous post for my classroom!

Isn't that ridiculously generous?!?! I mean, I'm a stranger. He doesn't know me. He just wants to help me inspire my students. Wow.

Gosh, I am just so amazed at the kindness people have within them. Truly, Anthony must follow his own advice and "work hard and be nice to people!" This has really inspired me to try my best to give to others. My friend did a 29 day giving challenge awhile ago, and Anthony's gift reminded me how important it is to give to others, especially strangers. I'm going to try to give, give, give over the next little while, and I'll report back the results if anything interesting happens.

If you like graphic artwork, with and without type, you should definitely check out Anthony Burrill's website. He rocks. :)

From http://www.anthonyburrill.com/
<3

Thank You! & Anthony Burrill

I just wanted to say thank you so much for the great response to my shoe wall! A huge thanks to High-Heeled Foot in the Door, Well Worn, and To Be Charmed, who all showed the project on their blogs. Isn't blogging so cool? That you can get inspired by other regular people, and learn so much, and take risks and try new things? I love it.

Anyway, as I mentioned in my profile, I am a teacher. Time this summer is very quickly zooming by, and I am starting to get a bit panicky about back-to-school. I do love teaching, and once I'm there, I'm sure I'll be excited, but right now I am really really enjoying my time off.

I'll be teaching grade eight next year. Last year, I taught grade seven, and next year I am going to loop up with my students so I get to teach them again. I've never done this before, but I think it's going to be really good - we don't have to spend all that time trying to figure each other out, and can dive right in.

When I saw these posters by artist Anthony Burrill, I thought they would be perfect as classroom rules! Don't you think?! What more can I ask, really, than "work hard and be nice to people!?"


All from Anthony Burrill's website.

Unfortunately, I can only find them in British Pounds, and they're 50 pounds each! Out of my budget. I wonder if they'd offer a teacher's discount? ;)

Wednesday, August 11, 2010

DIY Shoe Wall


I ran across this article a few days ago, called Home for Life. It asks,"at what point did the house become more about the future tenant than the current resident?" This article could not have come at a better time, because I've been thinking a lot about the changes I've been making to my condo and how they reflect my own personal style and not the bland, "greige" standards that you see in every house when you go house-hunting. I wondered about this when I was looking for my current place: what do the people who live here like? What is their style? Do they really like having "Swiss Coffee" walls throughout their home?? I understand that from a real estate point of view, the point is to allow the potential buyer to insert their own style and stuff within the shell. But I can't help but wonder: what was it like before the real estate agent told them to repaint? And I also wonder: what is my real estate agent going to make me change when it comes time to sell?

Then I considered these musings from a different point of view. In all likelihood, I'll be in my condo for another five years or so. And while I'm here, I may as well decorate it to my own taste, right? Right. So I abandoned these thoughts and allowed myself to become immersed in this photo:


from Living Etc.'s March 2010 issue.

 It's made the rounds recently on the blogs, and I came across it several times on a few of the blogs I read, and loved the bright colour and revolutionary idea of putting the shoes on the wall, and on display! But it wasn't until I saw Nicole's post on Well Worn about how to adapt this idea to flats that I thought I could do this myself. Like Nicole, I wear mostly flats. I have a few pairs of heels, but using the heels as a hook wouldn't work for me. Nicole's idea was to attach some pretty knobs to hang flats on.

From Well Worn.

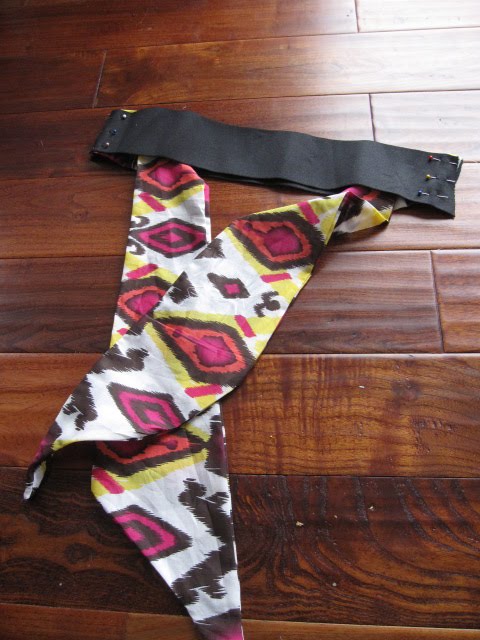
And her idea spurred an idea in me, as you can see if you read the comments on Nicole's post. Take a pretty piece of ribbon, sew some suspender clips on the ends, attach them to a pair of shoes and drape the ribbon over the knob. Yess!!!

So away I went.

This was definitely the most complicated DIY I have ever done by myself. I think I've probably spent two or three weeks now working on this project and its various components, and I think I have been to the Home Depot every day over the course of those two to three weeks. Seriously! Yesterday I did not go to the Home Depot and felt like a little something was missing from my life. Haha.

Okay, so let me show you the finished project, and then I'll talk about the individual components.

So, the basic project consists of wallpaper, mitred crown molding, knobs, small pieces of wood, ribbon, and suspender clips.

I painted the wall first. It's Benjamin Moore's Knoxville Gray (which I had read about on Apartment Therapy and fell in love with).

Then, I applied the wallpaper. I had to order it online. It's from Ferm Living and is called Voila. It's a map of Paris, and it's fabulous. Here's a shot from the Ferm website of the pattern:

Next up: crown molding. Okay, nightmare. I do not have many power tools. I have a cordless drill and (now, after this project) a Dremel. But at this point in the project, I bought a mitre box and a hand saw. The guy at the Home Depot was mean and would not cut it for me. So I put my mitre box on the floor of my garage, and got sawing away. Except here's what I forgot. I needed to stand the molding up as it would be on the wall to cut it or the angles would be all wrong. So I had to cut them all again. And hand sawing is hard work. I would recommend one of two things: 1) a power tool (i.e. mitre saw), or 2) flat molding, such as Janell's mirror frame she recently posted on her blog. Because it's flat, it would be MUCH easier to cut, even IF you wanted mitred corners.

From far away, the corners look okay, but they are not as clean as I could have liked them, and are pretty much depending on polyfill for their life.

More paint, this time Benjamin Moore's Raspberry Blush, which I posted about before. Love this colour! It's a pretty coral, and goes really nicely with the Knoxville Gray, I think. I painted the inside of the recessed "closet" and the frame this colour. (Funny how I learned about both those colours on Apartment Therapy! Call me a blog junkie! Or maybe very easily influenced!)

Okay, so now we have the basics, we need to think about the knobs. I had originally thought of just screwing them into the wall. But my dad nixed that idea for me, because of the way knobs are made, he explained.

My cat Trotsky will model for you and show you what I mean.

Do you like his rainbow toes? They are claw covers to prevent him from scratching me and the furniture.

Knobs have bolts on the back, so they can be secured to the back of a cabinet or a drawer.

Trotsky thinks this is pretty interesting.
So you need a piece of wood like this one to secure the bolt to, and then you'll need to grind down a bit of a hole in the back so the piece of wood will lay flat against the wall. This one I'm showing you is a dud because the bolt sticks out too far. See?

Now the other problem is the length of the screws used in the knobs. I needed to cut them down to be shorter so they wouldn't stick out too far. I suppose another solution would be to buy shorter screws, but many of the knobs had decorative ends to the screws that I didn't want to lose. So I bought a Dremel. I was tired of all these tools with single uses (feeling a bit Alton Brown-ish) and so a Dremel is great. You can use it to cut, grind, sand, engrave, whatever, depending on what accessories you have.

It has a blade that can cut metal.


So I sawed those screws right off! (Let me tell you! It tickles your hands!! Be sure to wear proper safety gear. Gloves are a good idea.)

Sweet little chickadee knob!

I live right on the edge of the city, and so I went for a little jaunt into the countryside and found myself a couple of dead logs to cut and use for the knobs, too. I painted the fronts of them because I would have to screw through them to attach them to the wall. I see that I need to do a bit more filling of the screw holes with polyfill on these ones. I added some clear glossy finish, as I was inspired by these bowls from Loyal Loot:
Please can I have one in every colour?!?!?!
I also hid a piece of wood with a bunch of simple hooks screwed into it under the bottom ledge of the frame:


Next, I scavenged some stuff from my parents' basement:

Two trinket organizers. Not sure what can go in here, as the compartments are rather small. So far I've added three rings and one "S" printing press block.


A little box that a bottle of something came in. I installed it sideways and put a little wooden cat, a heart-shaped rock, and that lovely little bird dish that my dear friend Sarah just gave me.

Some kind of crate. P.S. TOMS shoes are the comfiest shoes known to man. Or woman. I want to get some gold ones next.
Another big project I tackled was the yellow and white striped runner. I made it, and three smaller ones for the backdoor, screen door, and under the kitchen sink, using Camilla's tutorial from High Heeled Foot in the Door.

I used her instructions pretty much exactly, though I did make an improvement to the adhering technique because I had such a long rug.

Instead of folding half of the top fabric back to spray on the adhesive, I rolled it up. Then I sprayed and smoothed all the way down the length of the drop cloth.


And there you have it! A wall of shoes!

Related Posts Plugin for WordPress, Blogger...