Saturday, November 12, 2011

Gifted Magazine

I just eased into my morning by drinking coffee and reading Gifted Magazine.

Edited by Ez of Creature Comforts, one of my all-time favourite blogs, this is a well-curated digital magazine, designed to give you ideas for gifts to give this holiday season. As I flipped through it, I saw tonnes of stuff I know the people on my list would love. I just might be placing a few orders soon!


Monday, November 7, 2011

DIY Glitter Nails

These nail strips have quickly gained a reputation for themselves of being a quick and easy way to get a flawless manicure.

From here.

But they are expensive!

So I invented this great nail technique:
1. Paint your nail with clear nail polish.
2. Sprinkle craft glitter all over the nail.This blue is Recollections brand but have used Martha Stewart too and both work great.
3. Let dry. Brush excess glitter off skin around nails.
4. Paint a top coat over the glitter with the clear polish.


You get amazing glittery nails for a fraction of the price of those nail decals. They are very durable! Add a new top coat every couple of days and this manicure will last for days!


Pretty good, hey?!

Wednesday, October 19, 2011

The Ugly Couch

Exhibit A: Extremely ugly beige corduroy IKEA couch that has lost the stiffness in its cushions.


Now, I couldn't really do anything about the limp cushions, but....


Add eight packages of pearl grey RIT dye, and you get....

Exhibit B!

Cuter grey couch!
c

Oddly approves.

I'd never dyed anything quite so large, and I learned a few things:
  • Do it in smaller batches in the washing machine. I split the cushion slipcovers into two parts and did them in a couple of batches.
  • Before the washing machine drains, set the dial back to the beginning and run it through again for a deeper colour. That way the fabric spends more time in the dye solution.
  • Run your washing machine through with bleach TWICE afterwards. I did it once and then washed something and the water was grey.
Sorry about the crappy photo quality - I only had my cell phone.

Thursday, August 25, 2011

Continued Adventures in Sewing: The Shirred Fern Dress

Once I started sewing, I couldn't stop!

Today, I tackled this Most Flattering Shirt Dress from Prudent Baby (can I just say how much I love that blog?? I'm not a mama, but I still love it!).

I followed the directions exactly as written, except I made mine longer than the one on the blog.

I loved the way the bias tape was used to finish the neck and arm holes. Made for a very finished looking product.

This dress is in the running for my first day of school outfit!!!


The shirred waist makes this dress ultra flattering.


I found some really rad fabric with star constellations on it at the fabric store the other day, so my sewing marathon might not be over!

Wednesday, August 24, 2011

A Break from August Break: the Mullet Skirt

I know the point of August Break is to relieve you from the pressure of blogging, but it's okay for me to cheat if I want to, right?!

I start back at school on Monday and since I've had such a busy summer, I've been really trying to relax this week and only do stuff I want to do. I was feeling creative today, so I decided to do some sewing. I call it the Mullet Skirt. You will see why soon.


I saw a skirt somewhere, I don't remember where, that was short in the front, and long in the back. A mullet skirt, if you will.

Fabric choice was hard. I wanted something brighter as the lining, but my local fabric store didn't have anything that caught my eye. So I decided to go with a coordinating fabric rather than a contrasting fabric. Next time, I'll try something more eye-catching.

So here's a brief tutorial. The skirt is an elastic waisted skirt, and is based on this tutorial. I've made lots and lots of skirts based on this tutorial over the past year and they've been really quicky and easy, as well as really flattering.

This one was a bit more complicated, as I had to sew the interior lining to the exterior fabric.

First of all, rule #1 of sewing: Cats want to help:


Okay, so here we go. First, I found a skirt I liked the length of, and cut the top fabric to a similar size.


I wanted the front of the skirt to be flatter than the back, so I didn't use the full width of the fabric.

For the back panel, I measured how long I wanted it from my natural waist.


Trotsky is STILL "helping."
This time I used the full width.

You can see the difference of the length of the two panels. The front is going to get shorter in a minute.


I used the two panels in the purple fabric to replicate two identical panels in the lining fabric.

Next, I freehanded the swoop on the front panels. For economy's sake, I put the two front panels together and cut once.


Then I layed the cut front panels beside the back panels so I could line up the edges.


I pinned each of the two panels together along the bottom seam (the swoopy seam) with the right sides facing together.


Then I sewed, ironed the seams flat, and then turned the fabric right side out.


I repeated this procedure with the back panels. Then I pinned the two panels together along the side seams, with the right sides in. Right sides, in this case, being the purple fabric. It's important to make sure the bottom seams line up.


Please note that my bear-duck-elk fabric is UPSIDE DOWN. Because I am dumb.

Note that the back panel will pucker a bit because it's bigger. That's okay.

Now you sew your elastic waistband, and then pin your fabric to it. Be sure that you turn your elastic inside out, and pin the right side (purple) of your fabric to it, on the inside.

If you look closely, you'll see the elastic is inside out, and the purple is facing the right side of the elastic. Make sense? Kind of?

Then sew, and make sure you stretch your elastic as you do so it first over your hips!

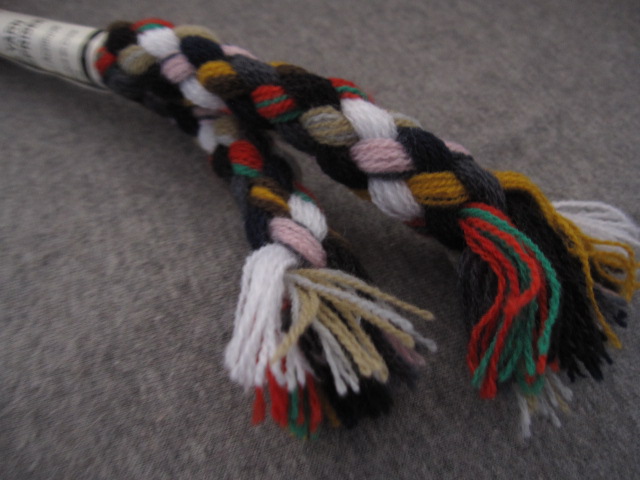
My last touch was this: I found this "mending yarn" at the fabric store and liked the colour combo.

I sewed the fringe shut so it wouldn't unravel, then hand sewed it to a button. I safety pinned the button to the waistband, so it could be removed for washing.


I like the end result, though next time I'd do a few things differently:
1. Make sure the fabric is right side up!
2. Make the back panel longer and the front panel shorter so the inside lining would be more visible.
3. Make the inside fabric brighter/contrasting so it would also stand out more.


P.S. It is HARD to take pictures of yourself. Here are some outtakes. lol.


Bwaaaahahahahah! That one's my favourite! I was trying to show the lining of the skirt but it ended up just looking trashy.

Monday, August 22, 2011

August Break: Trotsky

I missed Trotsky (and my other cat, Oddly) while I was away.


I'm participating in the August Break.

Sunday, August 21, 2011

August Break: Shades of Gray

Wandered around in the neighbourhood of Kensington on Saturday and found they were having a poetry festival.
I liked this poem.

I'm participating in the August Break.

August Break: Goodbye Jamaica

I missed a couple of days due to travel.

We made time the morning of our flight to do a bit more relaxing by the pool.

I'm participating in the August Break.

Thursday, August 18, 2011

August Break: Ocho Rios

Today we drove up to the north coast to Ocho Rios. It was a long and winding drive through the mountains, but it was worth it! It has been really great that through our school visits and our day trips, we've gotten to see a lot of different parts to Jamaica.

Once we got to Ocho Rios, we climbed Dunn Falls. When they told us we'd be "hiking the falls," I imagined that we'd be hiking up alongside a river to some waterfalls. Nope. You actually rent water shoes and CLIMB the falls. It was really, really fun.

Rio Cobre, in the mountains.

A roadside food stand.

The Falls.

The beach at Ocho Rios.

A sweet little girl swimming.

Climbing the Falls.

I'm participating in the August Break.


Wednesday, August 17, 2011

August Break: Little Ochie

After our final school visit today, we stopped at a little town called Little Ochie on the south shore. We had fresh-caught fish for lunch again, but this time we tried it jerk-style instead of fried. It was really good, but I still think the first one was better. Anyway, you place your order but it takes awhile to prepare the fish, probably 45 minutes - an hour. So in the meantime, we finally got to swim in the ocean! We went to get into the ocean, but before we did, this gaggle of little faces ran up to us saying, "Miss! Miss!! Don't go in! There's a shark!!!" We thought they were joking, but they seemed insistent. Then one of their fathers came up and said, "it's a dolphin." As soon as he said that, the kids jumped in. So did we. (P.S. There was no shark)


The kids were totally sweet, and stuck near us in the water, telling us their names, and who ranked where in terms of age, and where they lived (one family just in front of us at the beach, their cousins down past the bend in the beach a way down.) Then they started doing backflips and tricks and stuff, and kept calling us for our attention: "Miss!!! Miss!!! Watch me!!" So cute. And when we got a little too far out, they called us back in because they could tell where the current was because it would kick up the sand underneath and turn a stripe of the water a bit brownish. They were very concerned about us.

I think this was my favourite moment on our trip. The kids were so sweet, and it was great to just experience that moment of fun with them.

Little Ochie.

It's a fishing village.

Frying up some fish.

These are a fruit called guineps. You can buy them from roadside sellers. You peel them and then pop the flesh in your mouth and try to dissolve the flesh from the large pit inside. They taste good and are addictive. I couldn't really describe the taste... kind of like a grape, but different.

Jerk fish.

Little Ochie.


<><><> <><><> <><><>
I'm participating in the August Break.
Related Posts Plugin for WordPress, Blogger...