Tuesday, August 3, 2010

Tutorial: Kids' Field Notebook

I have a friend and his name is Daniel. Daniel is six years old, and is the son of my parents' neighbours across the street. My family is very close with Daniel and his family.

This idea came to me as I was in Home Depot for the 10,000th time already this summer. I was standing in the paint aisle, staring at all the lovely paint chips. I was remembering how much I loved paint chips when I was a kid, though I didn't actually do anything with them - I just loved all the beautiful colours. As I was standing there in HD, I remembered a blog post I had read ages ago (no idea where - I googled and googled, and came up empty) about a mum who made her kid a little notebook, and on each page, there would be a different coloured paint chip. The kid's job was to find a match to that colour in nature, and draw a picture or take a sample.

Daniel is a very inquisitive kid, and he loves science and loves to learn. So I thought this project would be right up his alley.

So I scammed a rainbow of paint chips when no one was watching and came home to make the book!

I started by folding over 8.5x11 printer paper and stitching five sheets together.
Then I wrote a little story about Daniel at the beginning.
And illustrated it, too.
That's Daniel and his cat, Jack.

 
I used cardstock-weight scrapbooking paper, a punch, and white calligraphy ink for the cover.

 I glued the pages into the cover.

Here's the story I wrote:


And then after the story, there was a paint chip on each page.

 So, after I finished the book, I thought Daniel would need some pencil crayons to colour his observations. So I got some pencil crayons, and some glue. But then I thought he would need something to carry it all in as he went on nature walks and so on. I admit, I got a little carried away. But I loved creating this little portfolio for his stuff, and Daniel's mom tells me he absolutely loves it! (I mailed it to Daniel, who lives in a different city than me, and he received it last week).

So here's the portfolio:


This is the outside.

And the inside.

Okay, so I'll tell you how I made it. It was all kind of "make it up as you go along," so I can't give measurements or anything, because I have no idea.

I just know that I needed:
  • two big rectangles, one in the patterned fabric, and one in the gray
  • two long rectangles for the pencil holder part
  • one square for the big gray pouch for the notebook
  • two small rectangles for the teeny pockets for tape and a pencil sharpener
  • four long rectangles for the handles
  • piping
  • iron-on interfacing
  • a clasp
I took pictures along the way, so maybe you will be able to see what I did and recreate it yourself if you are so inclined.

One big rectangle of patterned fabric. Love the fabric, by the way! I found it for $4/metre in the bargain section at Fabricland!

 I used interfacing I had on hand, and I had to cut it like that because of the size I had.
But you could probably just iron a big piece on the back of the patterned fabric.
The point of the interfacing is just to make the fabric stiffer.

 I hemmed the two long rectangles on the two long sides, then pinned them to the big rectangle and sewed.

 I measured for twenty four little pencil pockets and marked where I would sew with pins.

And this is what I got!
Next up was the big pocket for the notebook.
This was the hardest pocket because I decided to add piping, and so the sewing had to be really precise, and I also wanted rounded corners.
I had to use a LOT of pins.
Sorry the picture is blurry.

Here it is from the front.
I was a bit worried about the piping looking so uneven, but once I sewed, it was okay.
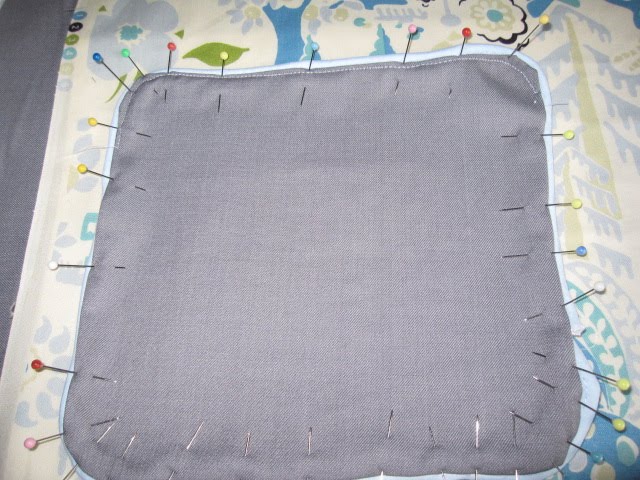
Sewing....

I forgot to take photos of the little pockets being made.
Same procedure. Fold, iron, pin, sew.

I made the handles next. I folded in the edges, ironed, and then pinned the piping between both layers.
Handy hint: I used a ruler and placed it inside the fabric, folded over the edges, and then ironed to make sure they were the same size.
Again, sorry for the blur.
Next, I pinned the piping to the patterned side. I rounded the corners simply by folding them.
Then I took the gray fabric, and freehand pinned it to the other layer.
Oh, and I cut out a "D" out of the patterned fabric and used a fancy stitch on the sewing machine to make it look like I surged it.
Oh yeah, and I also added a layer of that iron-on bonding stuff that fuses two layers of fabric together between the patterned layer and the gray layer. This was so that the fabric wouldn't gape apart when the portfolio was carried around.
The handles were also pinned between the layers.
I ironed, and then sewed the edges.
I'm sewing. Oddly's helping.
(P.S. Another summer project I am going to tackle is craft room organization. Sorry for that big mess back there.)
And that's it, really! It took a wee bit of figuring for me to get this project to work, but it was actually quite simple. The longest part just took me imagining what each part would look like and then executing a plan to make that imagined thing come to life.
Like I said, Daniel really loved it. I'll be going to visit my parents this week, so I'm hoping to see what he has observed! His mom said he's already got several entries completed!


Friday, July 16, 2010

New Desk

As I mentioned in my last post, I've got a list of things to do this summer - stuff I didn't have the energy or inclination to do while I was teaching. So summer time it is. Can I just say, first, though, how much I love summer? It is SO luxurious, after 10 months of a very inflexible schedule, to be able to sleep in, or not. To be able to go to a thrift store whenever I just feel like it. To be able to go for a bike ride or a walk at 2pm. And definitely, DEFINITELY to take a mini road trip to Nanton to go antiquing! The next item on my list of summer goals: figure out a desk.

I had an extremely improvised little shelf to hold my computer made of a $5 cupboard door from the As Is section in Ikea and a couple of brackets. It was very sad and definitely not chic.

Nanton is a town an hour south of the big city of Calgary. It's a quaint little town, and has marketed itself as the antique capital of southern Alberta. It has a bunch of antique stores lining its main street. So cute.

Nanton is a typical prairie town. It obviously values the past, though, because in addition to its love of antiques, Nanton's residents saved their grain elevators. These giants have quickly disappeared from the Western Canadian skyline in recent years in favour of more modern versions that store much more grain. I love the Prairie Giants, though. It's really nice to see people valuing these parts of our history. In Western Canada, our history is comparatively short. Alberta only became a province in 1906! People had only migrated here a short time before that. So our buildings are mostly new, and people tend to value the shiny and new and not put a whole lot of stock in buildings of the past. That's why Nanton appeals to me, I guess. My parents came from Eastern Canada, and brought with them a love of old buildings and taught me to value history.

That is downtown Nanton. A wide street with angle parking is rare nowadays.

 An old hotel. Doesn't it look like it would fit right in in a western movie? People playing cards downstairs and getting up to no good?

That right there is the best antique store in all of Nanton. It's in an old hardware store and the building itself is quite awesome. Inside is a treasure trove! I should have taken some pictures inside. Upstairs would have originally been apartments, and each of the six suites has been converted to a stall that serves like an antique mall. Vendors set up their stuff in there. What's super neat is that the apartments fixtures have been left alone. There's still kitchen counters and cabinets and stuff inside.

So, back to the desk. My budget was rather small. They had a whole bunch of gorgeous roll-top desks and neat little secretaries but they were out of my price range. I didn't want to spend all my savings. But then upstairs I found this rustic little table. And the best part: it was only $130!

Oddly thinks it smells rather interesting.

Storage is still a problem. I am going to need to figure something out for filing and paper storage and the like. I also need to get a shorter chair as mine doesn't quite fit underneath (it's just one of my dining chairs anyway). I also need to fix that chalkboard situation and maybe relocate them. They are a bit awkward there.

In the meantime, though, I also picked up that cool lemon crate on top of the desk.
It says "Sunkist Quail Brand" and then below "Lapland Lemon Growers Ass'n, Lapland, California."

Inside the crate is my computer terminal, some storage boxes (which I would like to replace), and pens and Sharpies and stuff.


On top is a treasure I found while on a nature walk with my dad on his piece of property in the country. Who knows how it got that round hole! It sort of looks like someone might have been using it for target practice, but then wouldn't the bullet have gone out the other side? It's perfectly intact, other than that hole right there on the front. Anyway, as you can see, I decided to turn it into a bit of a terrarium. The moss seems to be happy in there! We'll see about the fern.

The ink pot is another treasure I found out there at my dad's land.

I love treasure hunting! It's so fun!

Sunday, July 11, 2010

Pantry Reorganization

cx 444444444444===ç=-

I got a new kitten. She just typed that, above. Here she is!


She's pretty cute, huh? Her name is Oddly, after a character in a book my sister and I both adore.

Anyway, moving on. I posted before about Emersonmade's house, and specifically about their amazing pantry:
Well, in my condo I am not blessed with such a huge pantry, and mine is about one can-width wide. But I do what I can with what I can. I took off the little folding door and left it open, then papered the back with some pieces of shelf-liner paper. And repackaged a bunch of stuff in glass jars from Ikea.


The flours and sugar are in those bins at the bottom. They obviously don't fit very well, so I'm not sure if I'll move them or not.


I just used scrapbooking labels for the labels.


And there you have it! Oddly wants to type again so I think I'll leave it there before she deletes this post!

Thursday, May 20, 2010

Before & After: Message Board

Spray Paint is a girl's best friend. (Actually! I have really no desire for a diamond ring. I'd rather have, say, a really nice couch. Seriously!)


I found this message board for $3 at Value Village. I did really like the decals and the kitchyness of it, but I I really wanted something a bit more personalized and streamlined. So armed with a can of spray paint, a scrap of Anna Maria Horner fabric, and some scrapbooking sticker letters, I DIY'd this baby!


All I did was lightly sand the wood, tape over the chalkboard and bulletin board and spray paint it. Then I glued a scrap of the fabric over the bulletin board, and applied the sticker letters. Easy as can be! I hung it above my computer so I can use it for a space to sort mail and post important stuff. The hooks are a handy place to hang all those various cords that seem to clutter up a computer area.

Monday, May 17, 2010

Dream House

It's been a bit tough to wrap my head around having a blog. I am a busy teacher, and finding time (and energy) to photograph my projects and write entries about them is something I'm not used to yet.

So I'm not going to write an entry about a project, I'm just going to link some photos from one of the amazing Sneak Peaks at Design*Sponge, the first design blog I started to read and still my all-time favourite.

Like I've said before, I love colour, and Kristen Voortman's house uses it in such a pretty and fun way!

 The Design*Sponge sneak peak is just so inspiring! I want wallpaper like that!!!


Sooooooooo cute!!!!
Related Posts Plugin for WordPress, Blogger...