
This idea came to me as I was in Home Depot for the 10,000th time already this summer. I was standing in the paint aisle, staring at all the lovely paint chips. I was remembering how much I loved paint chips when I was a kid, though I didn't actually do anything with them - I just loved all the beautiful colours. As I was standing there in HD, I remembered a blog post I had read ages ago (no idea where - I googled and googled, and came up empty) about a mum who made her kid a little notebook, and on each page, there would be a different coloured paint chip. The kid's job was to find a match to that colour in nature, and draw a picture or take a sample.
Daniel is a very inquisitive kid, and he loves science and loves to learn. So I thought this project would be right up his alley.
So I scammed a rainbow of paint chips when no one was watching and came home to make the book!

I started by folding over 8.5x11 printer paper and stitching five sheets together.
Then I wrote a little story about Daniel at the beginning.
And illustrated it, too.
That's Daniel and his cat, Jack.

I used cardstock-weight scrapbooking paper, a punch, and white calligraphy ink for the cover.

I glued the pages into the cover.
Here's the story I wrote:


And then after the story, there was a paint chip on each page.
So, after I finished the book, I thought Daniel would need some pencil crayons to colour his observations. So I got some pencil crayons, and some glue. But then I thought he would need something to carry it all in as he went on nature walks and so on. I admit, I got a little carried away. But I loved creating this little portfolio for his stuff, and Daniel's mom tells me he absolutely loves it! (I mailed it to Daniel, who lives in a different city than me, and he received it last week).
So here's the portfolio:

This is the outside.

And the inside.
Okay, so I'll tell you how I made it. It was all kind of "make it up as you go along," so I can't give measurements or anything, because I have no idea.
I just know that I needed:
- two big rectangles, one in the patterned fabric, and one in the gray
- two long rectangles for the pencil holder part
- one square for the big gray pouch for the notebook
- two small rectangles for the teeny pockets for tape and a pencil sharpener
- four long rectangles for the handles
- piping
- iron-on interfacing
- a clasp

One big rectangle of patterned fabric. Love the fabric, by the way! I found it for $4/metre in the bargain section at Fabricland!

I used interfacing I had on hand, and I had to cut it like that because of the size I had.
But you could probably just iron a big piece on the back of the patterned fabric.
The point of the interfacing is just to make the fabric stiffer.
 I
I I hemmed the two long rectangles on the two long sides, then pinned them to the big rectangle and sewed.

I measured for twenty four little pencil pockets and marked where I would sew with pins.
 A
AAnd this is what I got!

Next up was the big pocket for the notebook.
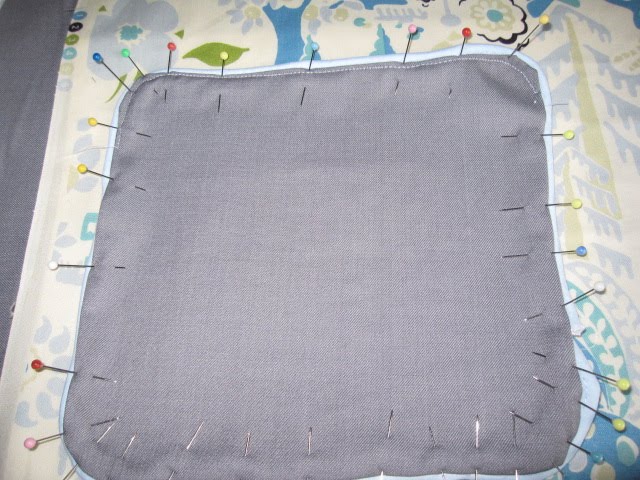
This was the hardest pocket because I decided to add piping, and so the sewing had to be really precise, and I also wanted rounded corners.
I had to use a LOT of pins.
Sorry the picture is blurry.

Here it is from the front.
I was a bit worried about the piping looking so uneven, but once I sewed, it was okay.
Sewing....
I forgot to take photos of the little pockets being made.
Same procedure. Fold, iron, pin, sew.

I made the handles next. I folded in the edges, ironed, and then pinned the piping between both layers.
Handy hint: I used a ruler and placed it inside the fabric, folded over the edges, and then ironed to make sure they were the same size.

Again, sorry for the blur.
Next, I pinned the piping to the patterned side. I rounded the corners simply by folding them.
Then I took the gray fabric, and freehand pinned it to the other layer.
Oh, and I cut out a "D" out of the patterned fabric and used a fancy stitch on the sewing machine to make it look like I surged it.
Oh yeah, and I also added a layer of that iron-on bonding stuff that fuses two layers of fabric together between the patterned layer and the gray layer. This was so that the fabric wouldn't gape apart when the portfolio was carried around.

The handles were also pinned between the layers.
I ironed, and then sewed the edges.

I'm sewing. Oddly's helping.
(P.S. Another summer project I am going to tackle is craft room organization. Sorry for that big mess back there.)
And that's it, really! It took a wee bit of figuring for me to get this project to work, but it was actually quite simple. The longest part just took me imagining what each part would look like and then executing a plan to make that imagined thing come to life.
Like I said, Daniel really loved it. I'll be going to visit my parents this week, so I'm hoping to see what he has observed! His mom said he's already got several entries completed!
came here via Craftzine - I really like your idea of looking for pieces of nature that match paint chips! I think I might be making something like this for a preschool aged nephew this Christmas...
ReplyDeleteThank you! I visited Daniel last week, and he showed me what he's done so far. He's really loving the task of matching things in nature to the paint chips! His favourite thing is taking samples and taping them into the book. He loves it when he finds something that "camouflages" into the paint chip. :)
ReplyDeleteI think it would make a GREAT Christmas gift!
I'm totally linking up to this. It is so amazing! I have a blog dedicated to early literacy and I think this would be perfect. I'm going to send some readers your way.
ReplyDeleteThanks for sharing such a beautiful idea.
http://onthelap.blogspot.com/2010/08/field-notebook-for-kids.html
Graciously,
Aimee